Please enable JavaScript to view this site.
Logo for imoptimal.com - small business website expert

Small business website speed (Towards better conversion rate)

I. PHP version

1. What's the benefit of website speed optimisation?

In today's world, where everyone is used to fast loading apps and websites, you shouldn't lag behind. Your website visitors are not the only ones that value fast websites - search engines do it also. Website speed is one of the main factors for SEO ranking. Thus, website speed optimisation:

  • improves visibility of the website, ensuring more visitors (and potential clients);
  • lowers bounce rate (visitors stay longer), increasing the chances for conversion.

The first place you should start with speed optimisation is the foundational layer - that's the website server.

2. Why you should update PHP to the latest version?

If you're using WordPress, it's likely you already heard about PHP. It's a server side programming language that executes every page request in WordPress. This means that it has a big impact on your website overall performance.

Each new version of PHP is faster than the previous one (and reduces memory usage). Plus it usually comes with patches for security bugs and vulnerabilities. That's why you should always tend to have the latest version of PHP set on your hosting.

New PHP release happens approximately once a year, so you don't need to constantly check for newer versions. And have in mind that you should wait for about a month after the new release before the update. This will give time for WordPress plugins to adjust to the newest PHP version and avoid any conflicts/errors.

Before I explain how to change the PHP version of your website, I'll show you how to easily check the current PHP version in your WordPress admin dashboard.

2.1 How to check current PHP version in WordPress

After you login into your WordPress admin dashboard, open the main menu (icon located in the top left header section). There you'll find the menu item named 'Tools'. After you tap on it, submenu items will be shown - tap on the 'Site Health'. [Check the image below]

Image 1.1 (Small business website speed tutorial)

This will lead you to a new page titled 'Site health' - with two tabs ('Status' and 'Info'). Tap on the 'Info' tab. [Check the image below]

Image 1.2 (Small business website speed tutorial)

Scroll down until you see the 'Server' list item. Once you tap on it - look for the section titled 'PHP version'. There you'll find the current version of PHP active on your server/hosting. [Check the image below]

Image 1.3 (Small business website speed tutorial)

If you're unsure what's the latest version of PHP, you can always check this link - Supporet versions of PHP. Even if you don't use the latest version listed there, make sure you're using only the versions tagged as 'Active support' (still continuously updated). [Check the image below]

Image 1.4 (Small business website speed tutorial)

Before you update the PHP version, there are few things to consider.

First, you should update the WordPress core, your theme and plugins to their latest version. And if you're using popular/reputable plugins, that are updated regularly, it's likely they're keeping up with the PHP updates. Just remember the one month delay rule I mentioned before.

Once you update the PHP version - if there's indeed an error (caused by outdated PHP code in your WordPress theme or plugins), you should revert back to the previous PHP version. The error log should clearly point to the plugin folder where the error occured. You should contact the plugin's support and ask if they're planning an update and when. If they're not planning any updates, consider to find an alternative for that plugin.

As with any major update for your website - make a website backup just in case something unpredictable happens.

Now, let me show you how to update your PHP version.

2.2 How to update PHP version of your small business website

This step depends on your hosting provider. If they're giving you the option to change it yourself - it should be clearly visible in your website settings, once you login into your hosting account. If you can't find it, it's possible you can't access it directly by yourself. In that case, you need to contact their support and ask them to update PHP version or guide you through the process of updating it yourself.

Here's a link you can find tutorials for the most popular hosting providers - Hosting-specific tutorials. I apologize if any of those links aren't up to date or are invalid - I'm not the one who's maintaining that link library.

II. CDN (content delivery network)

1. What is a CDN and why you need it?

This step is one of the most important things you need to setup in order to have a fast and secure website. Many items on the checklist that follow will be done through your CDN.

If you ever searched the web on how to improve your small business website speed or security, you probably already came across the term CDN.

In short, CDN is a system of globally distributed servers, that help you deliver your website files faster to users all around the world (regardless of their location).

Usually, your website files are served from one location only (the location of your hosting provider's server). This results in a variable speed performance, depending on the physical distance of the user from the server location - the bigger the distance the slower the loading time.

CDN doesn't only improve your small business website speed, but adds a layer of security on top. But let's focus on the main subject of how to connect your website to a CDN and set it all up.

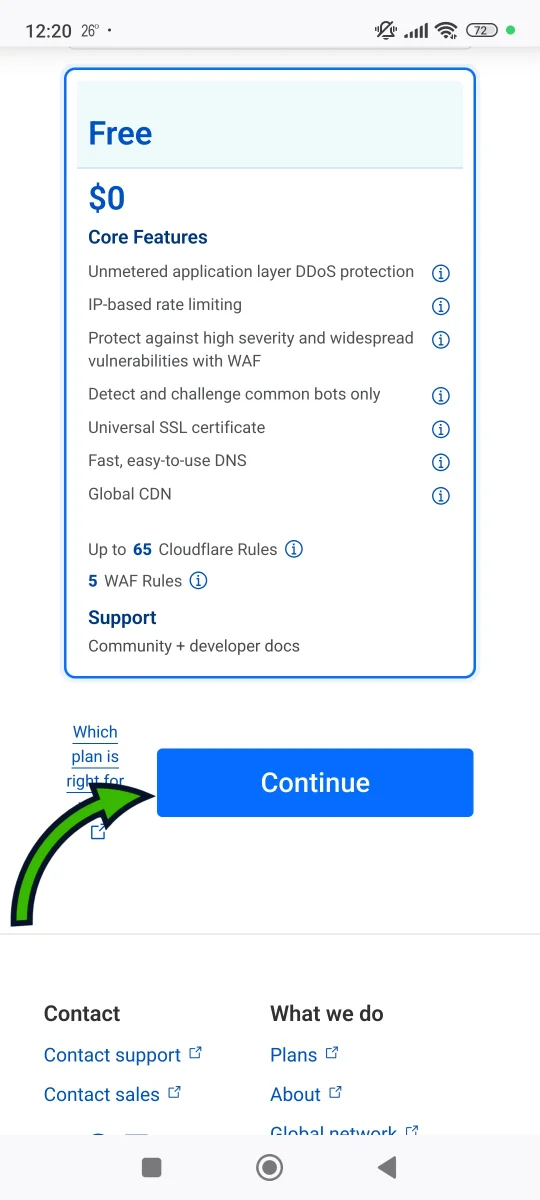
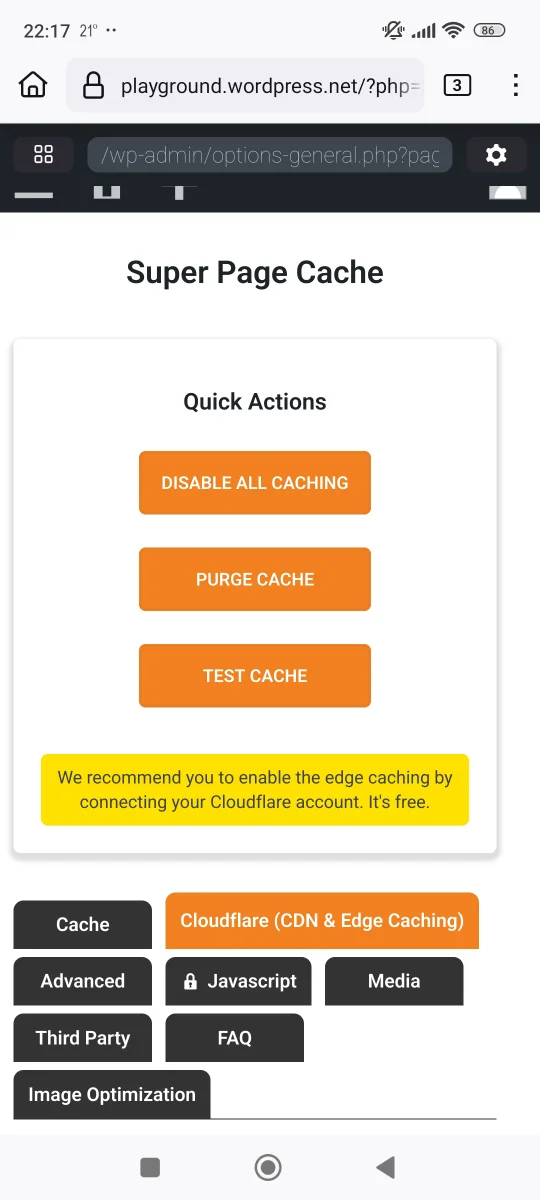
First of all, you should decide what CDN provider to choose. The most popular option, that also has a free tier (good enough for most small business use cases) - is Cloudflare CDN.

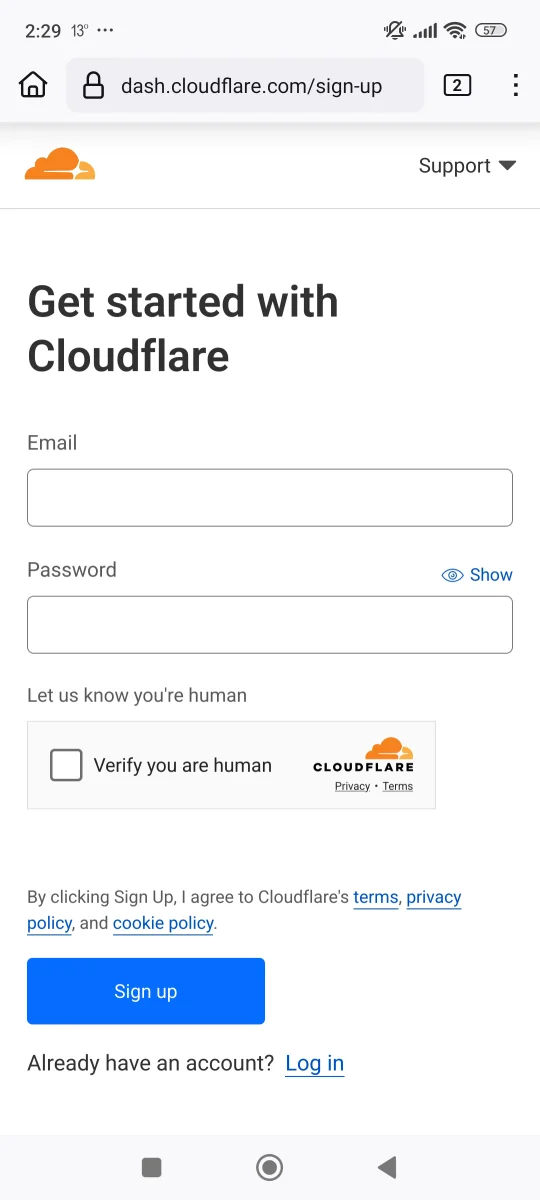
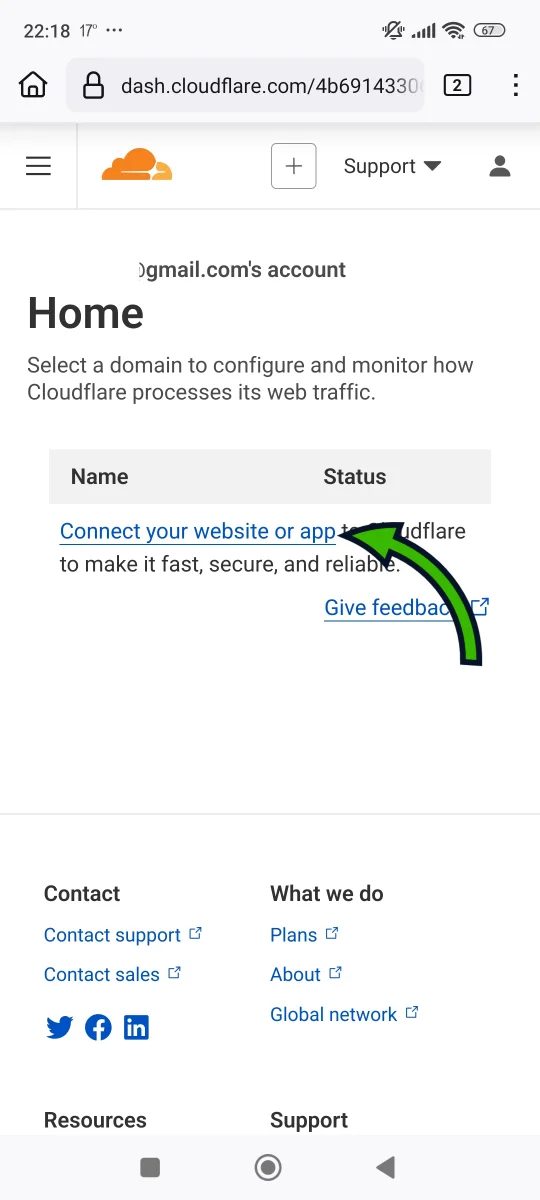
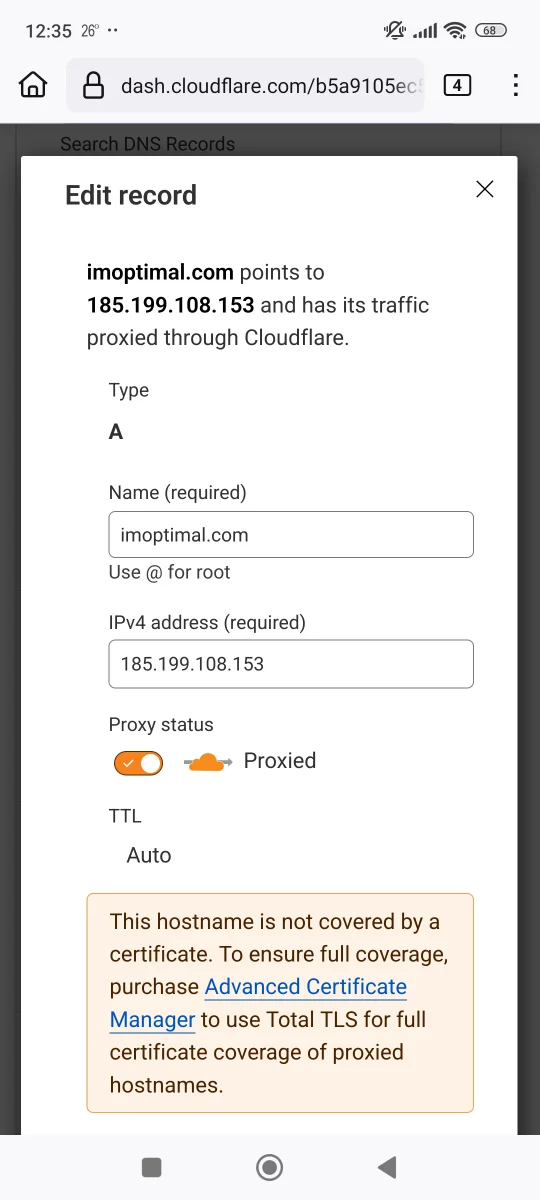
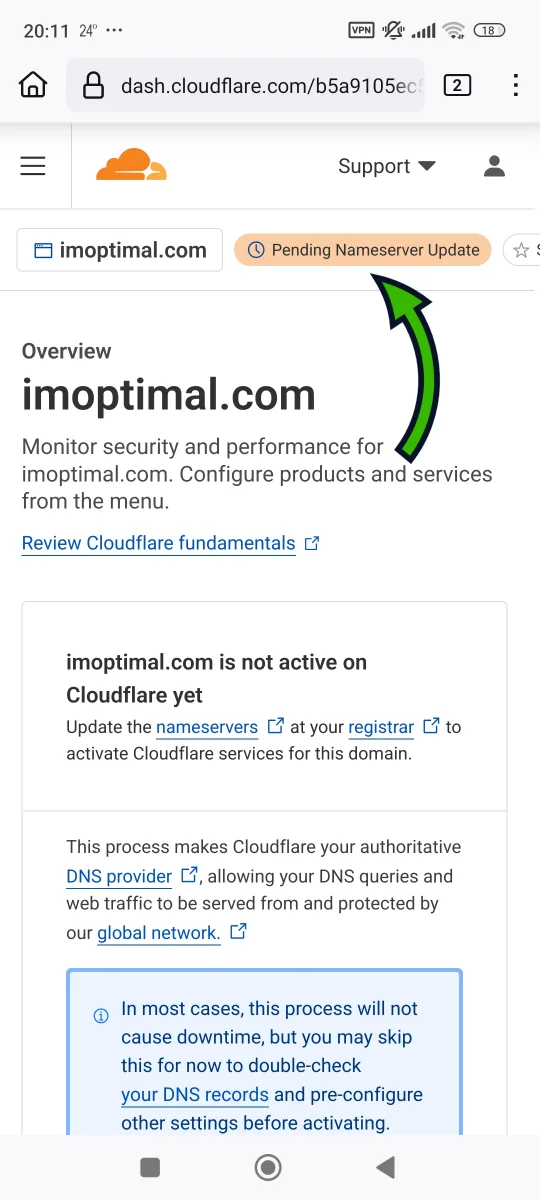
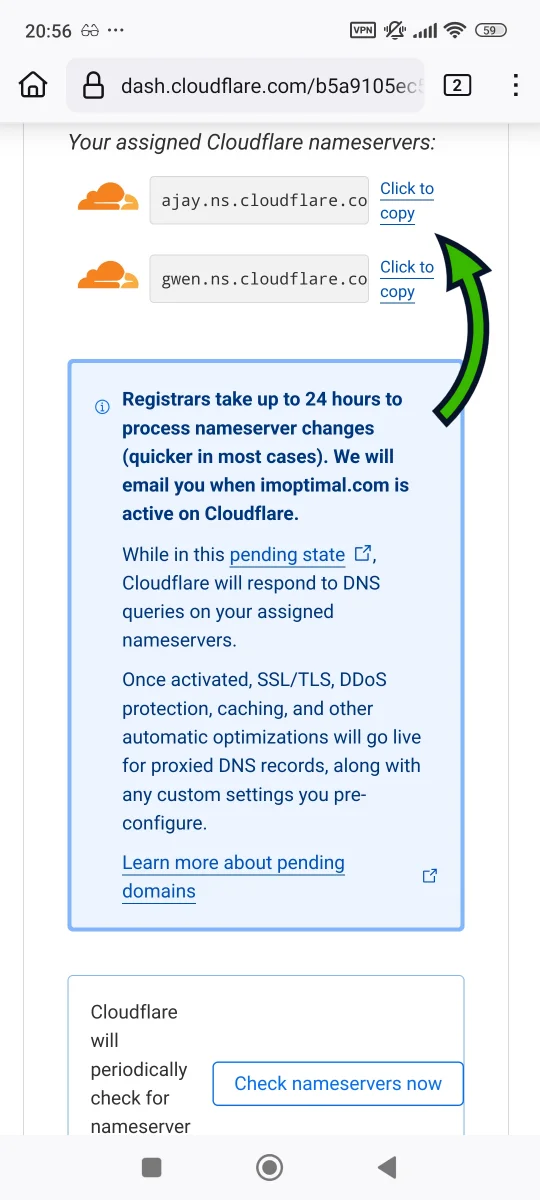
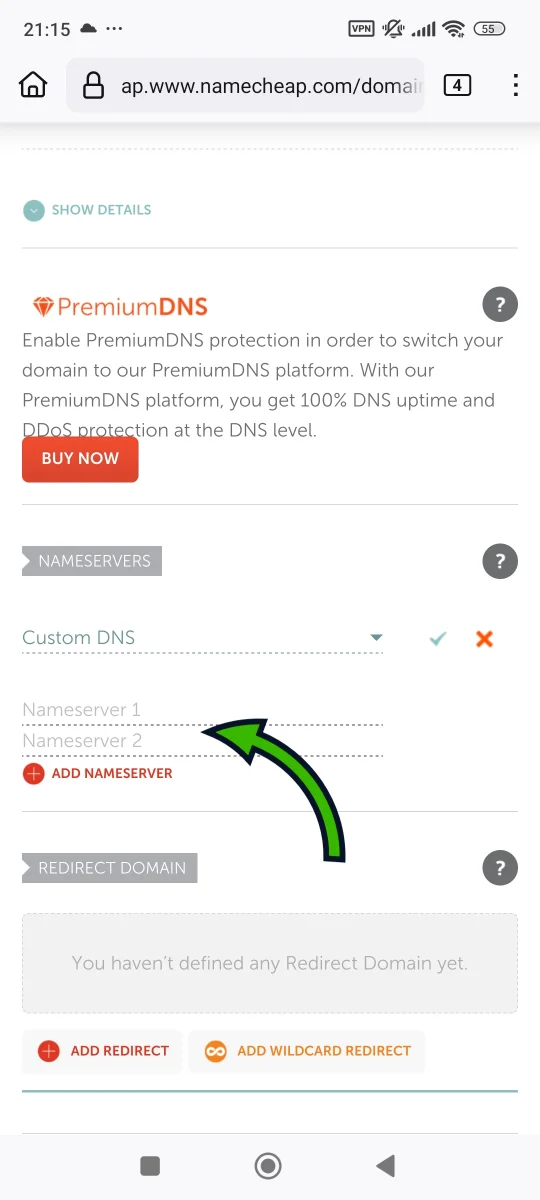
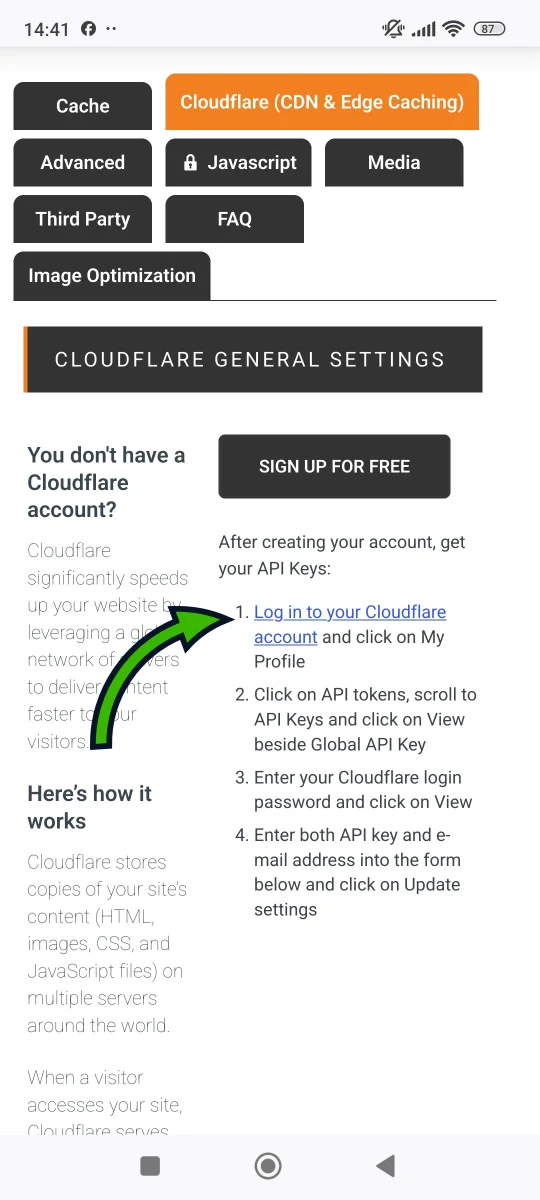
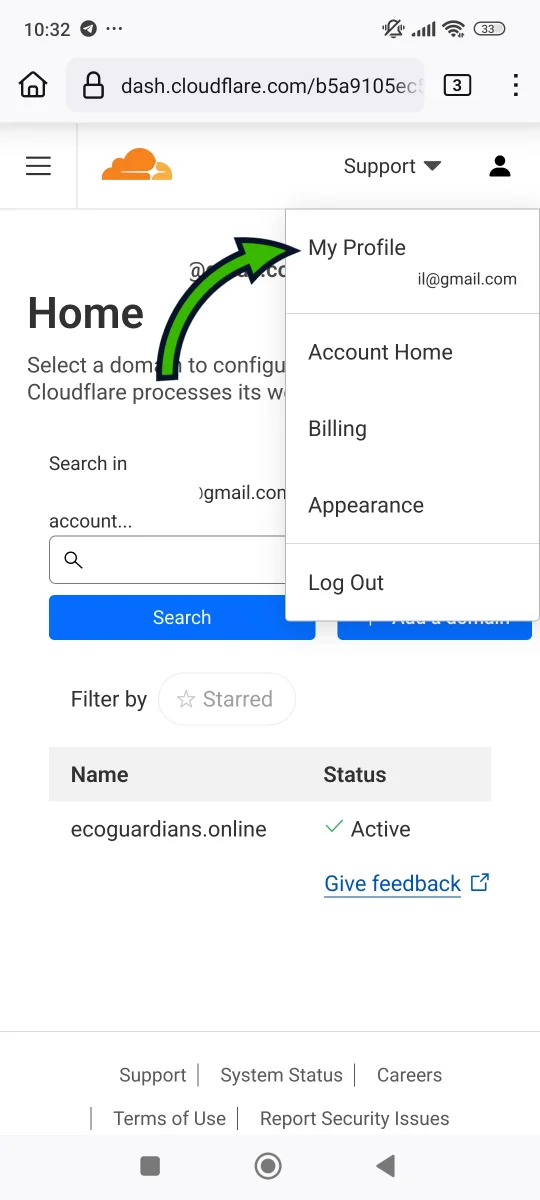
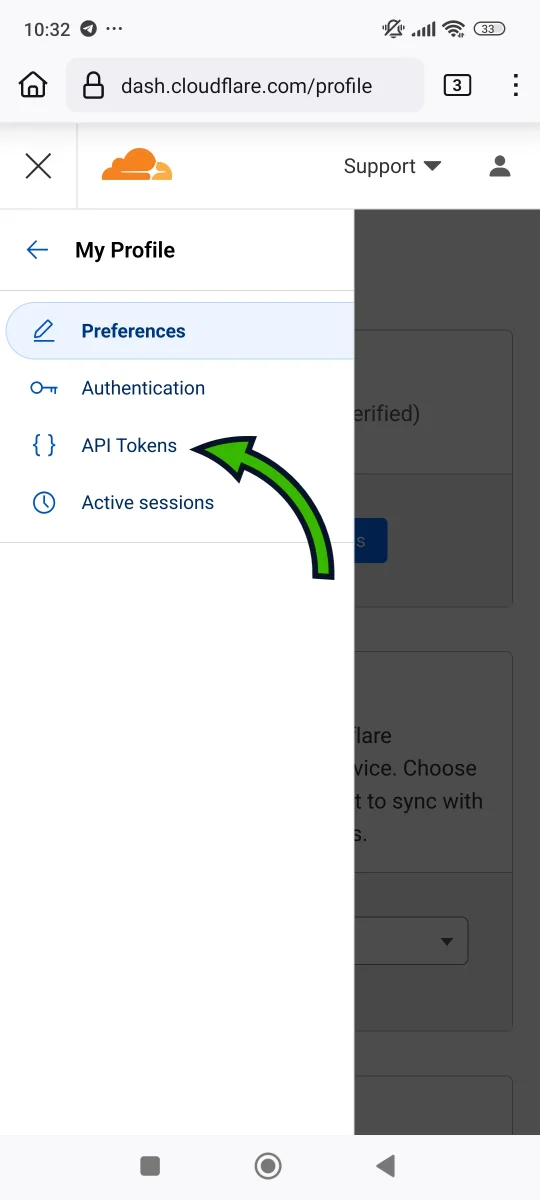
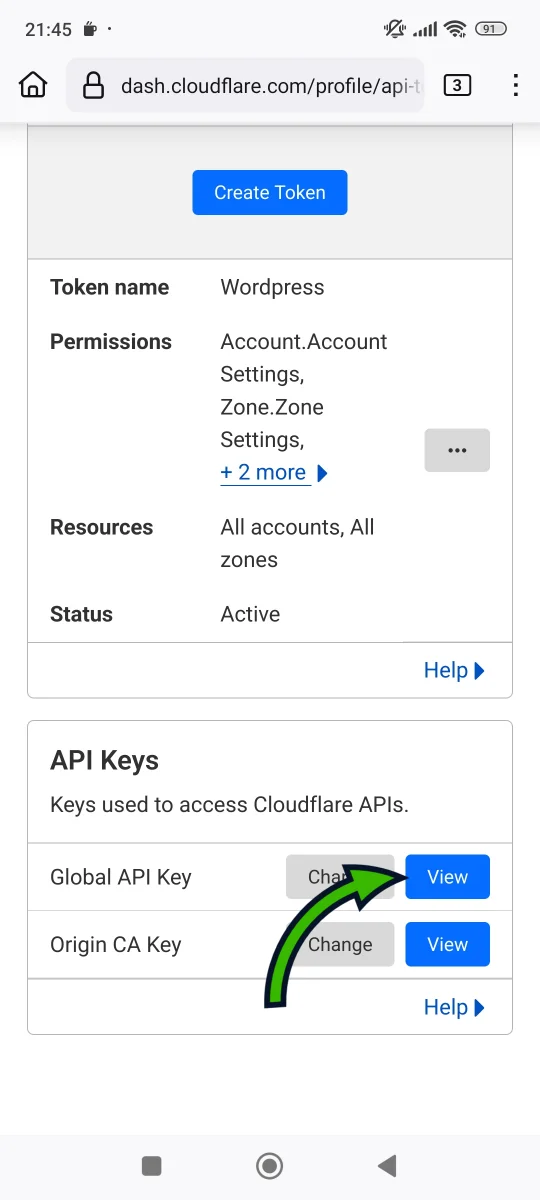
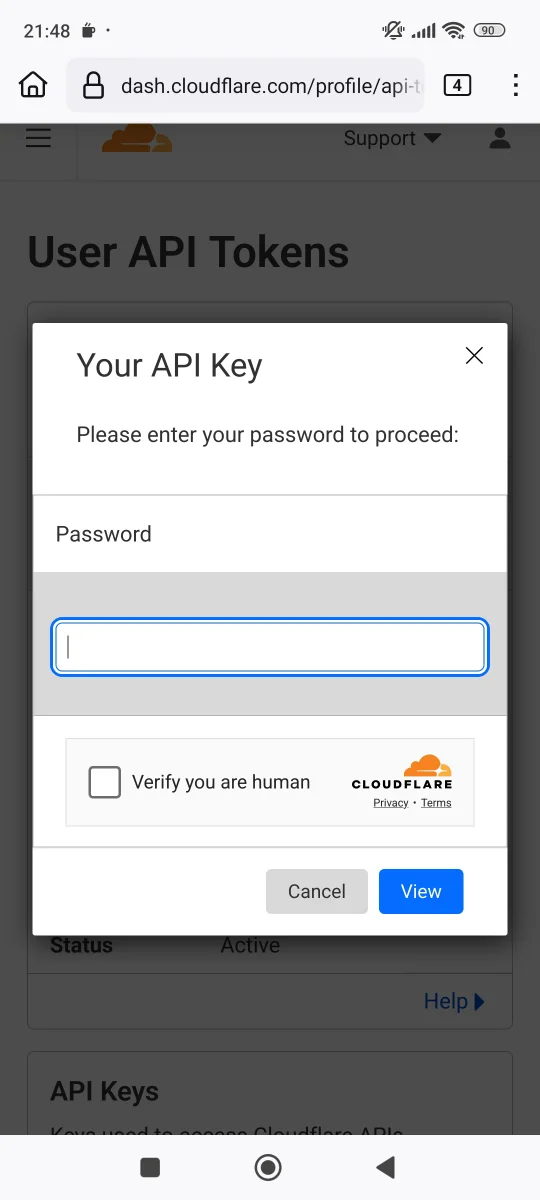
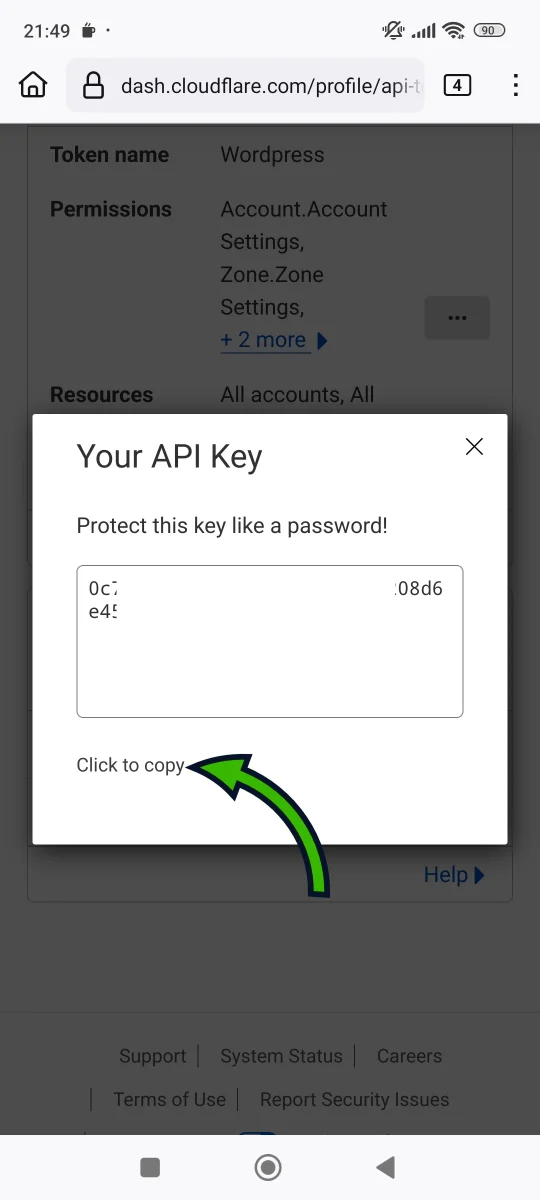
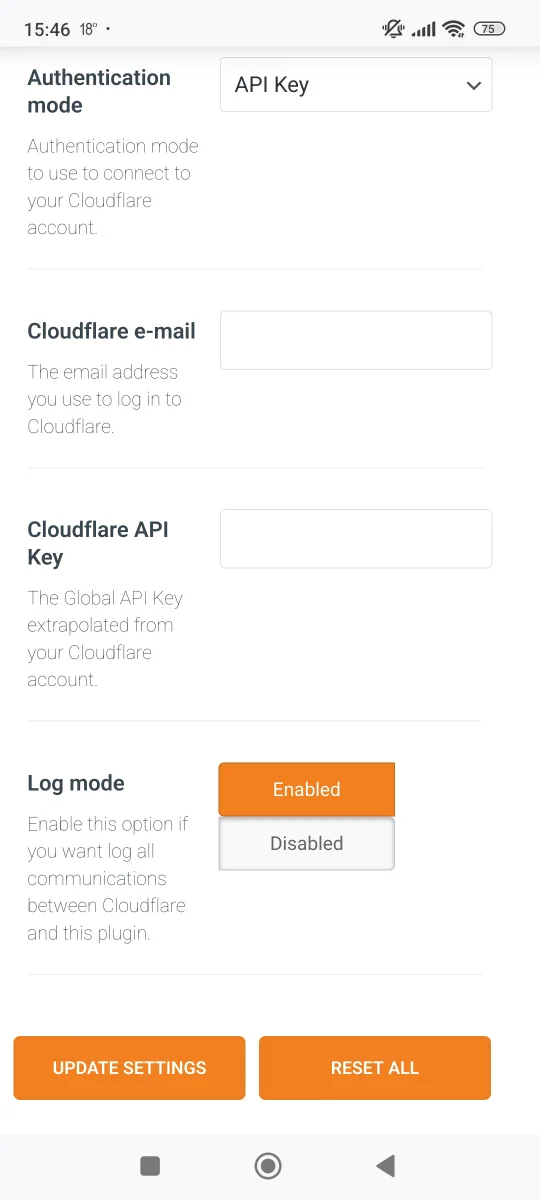
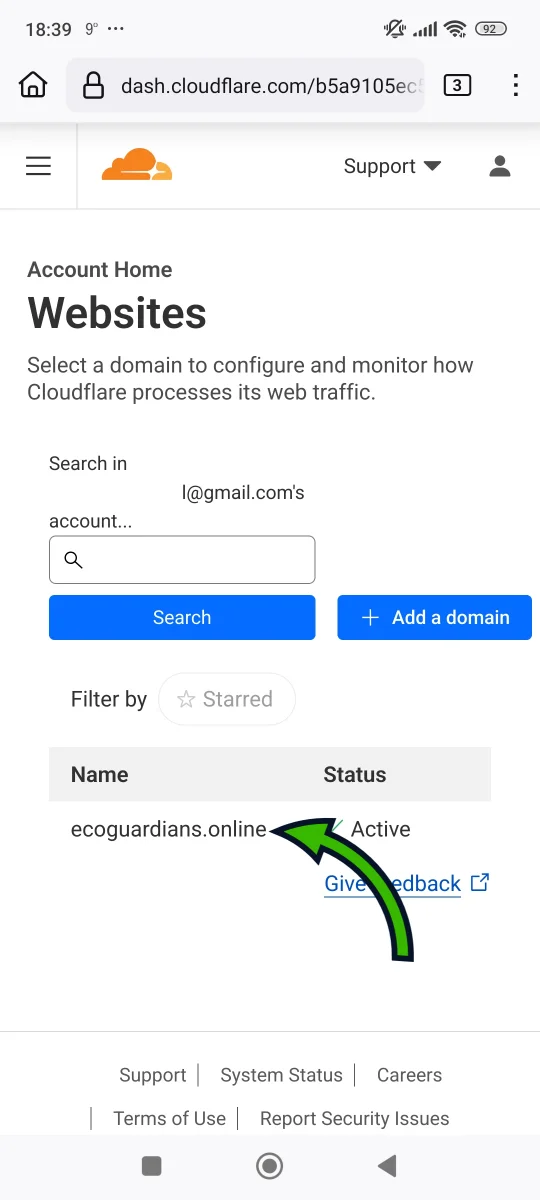
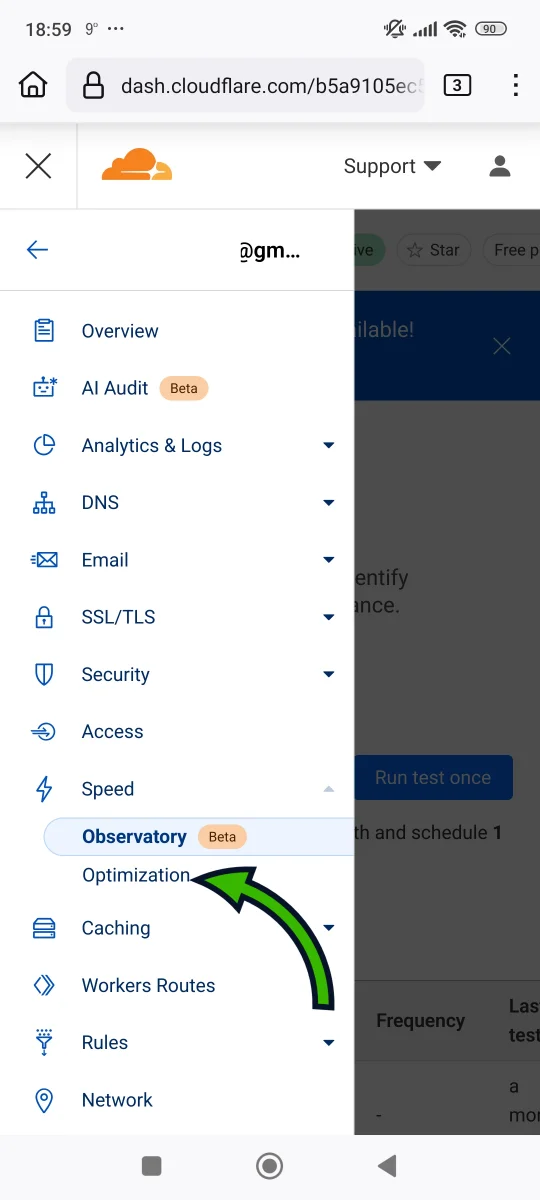
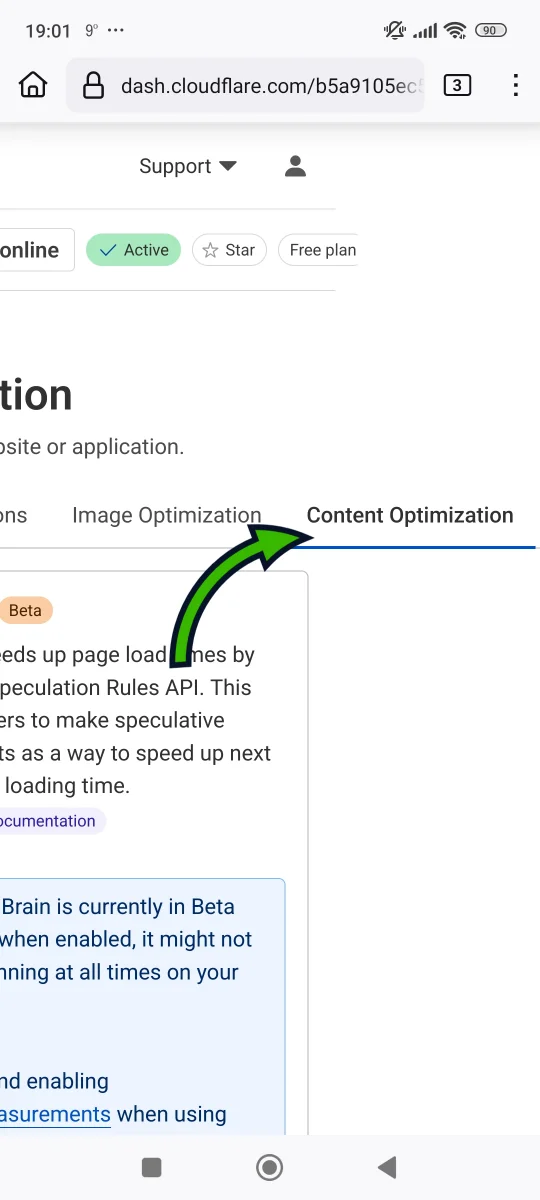
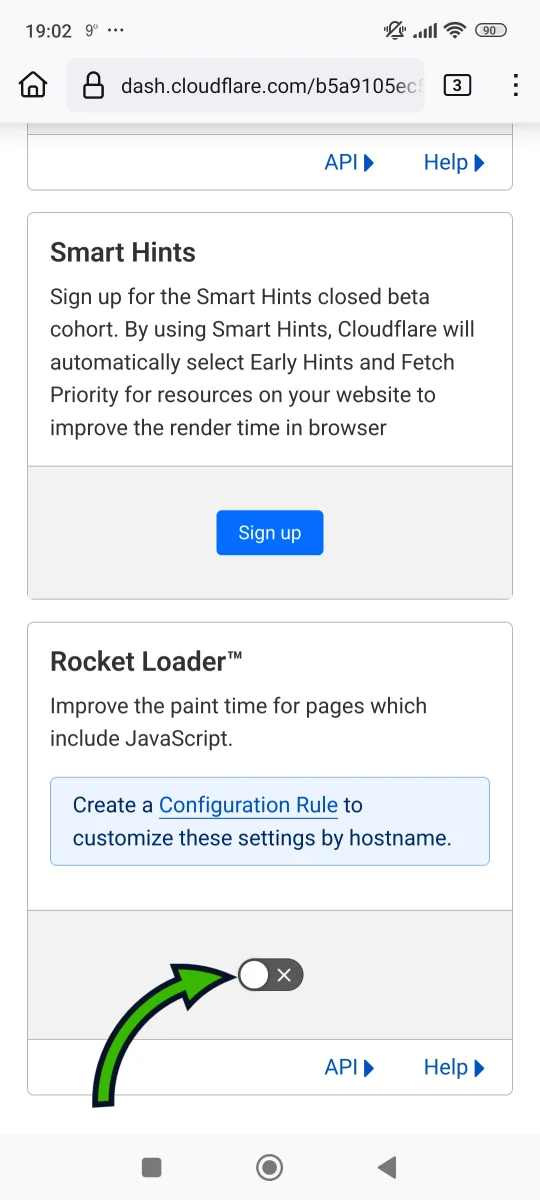
Before we come to the main CDN options, I'll guide you through the process of creating a Cloudflare account, and show you all the things you need to setup first on their website.

2. How to connect your small business website to Cloudflare

If you don't have Cloudflare account already, you need to sign up on their website - on the homepage (by tapping the button 'Start for free'), or finding the 'Sign Up' button at the bottom of their websit menu (located at the top of the page). [Check the image below]

In case you already have a Cloudflare account - SKIP TO DNS SETUP.

Image 2.1 (Small business website speed tutorial)

As with any other account creation, you need to fill out two fields - your email and the password for your Cloudflare account. [Check the image below]

Image 2.2 (Small business website speed tutorial)

The next step is to add your website to Cloudflare. After you login, tap on a link 'Connect your website or app'. [Check the image below]

Image 2.3 (Small business website speed tutorial)

That will open another screen - with a single field to type your domain. In this field you should enter your website URL (without the prefix - https://), and tap the 'Continue' button to scan your existing DNS records.

In short - DNS (domain name system) record is a set of instructions used to connect domain names with internet protocol (IP) addresses. DNS makes it possible for users to browse the internet with customizable domain names and URLs rather than complex numerical IP addresses. [Check the image below]

Image 2.4 (Small business website speed tutorial)

Now, scroll down and select the Free plan and tap 'Continue' button. [Check the image below]

Image 2.5 (Small business website speed tutorial)

Next, you will see your DNS records screen, that will show your domain DNS records market as proxied (already forwarded to Cloudflare). [Check the image below]

Image 2.6 (Small business website speed tutorial)

If it's not automatically marked as proxied, or you want to include/exclude individual subdomains - tap the edit icon (blue pen icon next to each record). This will open a pop-up where you can tap a slider to add or remove that DNS record from Cloudflare. Be sure to scroll down and save the change by tapping on the 'Save' button.

Have in mind that there could be some DNS records related to other services (like email or Google Analytics), and you shouldn't set them to proxied. [Check the image below]

Image 2.7 (Small business website speed tutorial)

Now, if you return to the Overview page of your Cloudflare dashboard, you will see a notification on the top of the screen - 'Pending Nameserver Update'. This means there's one more step to do to enable CDN functionality on your small business website. [Check the image below]

Image 2.8 (Small business website speed tutorial)

If you scroll down, you'll find the nameservers you need to copy-paste in your domain registrar. One thing to note here - since it can take time to for this change to take place, your website can be inaccessible for up to few hours. [Check the image below]

Image 2.9 (Small business website speed tutorial)

It's possible that you got domain name in your package with hosting, so you'll need to contact your hosting support to assist you in this.

I'll show you an example from my own domain registrar - Namecheap. In the Namecheap dashboard, I selected the domain I wanted to configure, and found the section titled 'Nameservers'. Here I selected an option named 'Custom DNS' - that enables me to paste assigned nameservers previously mentioned. [Check the image below]

Image 2.10 (Small business website speed tutorial)

You'll get an email notification once the status is changed from pending to active. You'll also see it clearly in your Cloudflare dashboard.

3. 'Too many redirects' error and how to resolve it

It's important to check now is your website accessible (is it loading when you open it in a browser), because there's a possibility the default Cloudflare SSL settings are causing too many redirects error.

If that's the case, make sure to change the SSL/TLS encryption setting from the default automatic to custom. You can find this option in the main menu in your Cloudflare dashboard - 'SSL/TLS Overview' page. Once you're on that page, find the 'SSL/TLS' section and tap on the 'Configure' button. [Check the image below]

Image 2.11 (Small business website speed tutorial)

This will open another page, titled as 'Configure encryption mode'. Here you need to select 'Custom SSL/TLS'' option. Once you select this option, you will see a list of encryption modes. Scroll down until you come to the 'Full (Strict)' mode and select it. Don't forget to tap the 'Save' button at the bottom of this page. [Check the image below]

Image 2.12 (Small business website speed tutorial)

The change should be active immediately, and you will see if you try to access your website in the browser again.

Now that your domain is connected to Cloudflare, you should have an immediate boost in your website speed. That's it for this step. Don't be tempted to change anything in the 'Quick Start Guide' - we'll deal with it in the steps that follow.

III. Web cache

1. What is cache and how does it benefit website's performance?

Caching is the process of storing copies of files in a temporary storage location, so that they can be accessed more quickly. There are many different types of cache, but in the case of your website - there's egde and browser caching.

Edge cache stores frequently accessed data (website files) closer to the end users, at the edge of a CDN (physically closest server), to reduce latency and improve website loading time.

Browser cache stores a copy of the webpage's content (website files) on the device’s hard drive during the initial (first) webpage visit. This way, the next time the user loads the page, most of the content is already stored locally and the page will load much quicker.

If you followed the previous article and added your domain to Cloudflare CDN - you enabled both of these cache options for your website. By default Cloudflare CDN caches most of the static files of your website loaded onto the page (media files - images, videos; CSS and JavaScript files). However, it doesn't cache the whole webpage (HTML files).

That's why you need to install an additional WordPress plugin in order to adress that, but also to resolve few other issues caused by a dynamically loading website content (stored in your website's database).

2. How to connect 'Super Page Cache' WordPress plugin with your Cloudflare account

First step is to install the 'Super Page Cache' plugin in your admin dashboard. Head over to the main menu, and find the 'Plugins' menu item. Tap on it to reveal the sub-menu items. Now tap on the 'Add New Plugin' to go to the 'Add Plugins' page.

There you should type in the search input field the name of this plugin. Once it shows in your search results, tap the 'Install Now' button to install it. It will take few seconds for the installation to finish. You'll know it's finished, because the 'Install Now' button will be changed into 'Activate' button. Tap on it to active the plugin. [Check the image below]

Image 3.1 (Small business website speed tutorial)

After you activate the plugin, you will be redirected to its options page (available in the main menu, under the 'Settings' menu item). There you'll come across only one button - 'ENABLE PAGE CACHING NOW'. You need to tap on it, in order to access all of the plugin's functionality. [Check the image below]

Image 3.2 (Small business website speed tutorial)

This will open all of the available cache options - grouped under different tabs. Most of the default options are optimised and should remain unchanged. [Check the image below]

Image 3.3 (Small business website speed tutorial)

The one thing you need to do manually here - is to connect the Cloudflare CDN with the plugin (using API key). Open the 'Cloudflare (CDN & Edge Caching) tab, and tap on the 'Log in to your Cloudflare account' link to head over to your Cloudflare dashboard. [Check the image below]

Image 3.4 (Small business website speed tutorial)

In the Cloudflare dashboard, tap on your profile icon (in the header section, top right corner). This will open a drop-down menu, where you need to tap on the 'My Profile' menu item. [Check the image below]

Image 3.5 (Small business website speed tutorial)

Once the profile page is loaded (don't be confused by its title - 'Preferences'), tap on the main menu icon (header section, top left corner). In the opened side menu, tap on the 'API Tokens' menu item. [Check the image below]

Image 3.6 (Small business website speed tutorial)

Now that you're on the 'User API Tokens' page, scroll down to section titled 'API keys'. Tap the blue 'View' button for 'Global API key'. [Check the image below]

Image 3.7 (Small business website speed tutorial)

This will open a pop-up with an input field where you need to type in your Cloudflare account password. After you type your password, tap the 'View' button. [Check the image below]

Image 3.8 (Small business website speed tutorial)

Finally, you'll see your API key that you need to copy by tapping the 'Click to copy'. Important note here - don't share this API key with anyone else (it gives direct access to your Cloudflare account). [Check the image below]

Image 3.9 (Small business website speed tutorial)

Once you got the API key, go back to your WordPress admin dashboard - and go to the 'Super Page Cache' plugin options page. Under the 'Cloudflare (CDN & Edge Caching) tab, scroll down until you reach the ' Cloudflare e-mail' and 'Cloudflare API Key' input fields. Fill the data accordingly (paste the previously copied API key), and tap the 'UPDATE SETTINGS' button at the bottom - to store the made changes. [Check the image below]

Image 3.10 (Small business website speed tutorial)

3. Basic setup of the 'Super Page Cache' plugin

Once you activate your API key, you will see some additional options under the Cloudflare tab, including the Cloudflare cache and browser cache max-age. These options give you a possibility to set the storage duration of the cached files of your website (once stored).

The first option, that refers to the edge cache - 'Cloudflare Cache-Control max-age' is set to 1 year by default (expressed in seconds). I would recommend changing this to 1 month, since your website should be updated regularly with fresh content. The number you need to set here in seconds is 2.592.000 (equivalent to 30 days).

The second option - 'Browser Cache-Control max-age' is set to 1 minute by default. I would recommend setting this to 604.800 seconds (equivalent to 1 week).

IMPORTANT - you should also check the box to purge the cache for related pages, each time a change is made on your website (it's marked as recommended, but not set by default). Remember to save all the changes. [Check the image below]

Image 3.11 (Small business website speed tutorial)

Now, if you go back to the first tab titled 'Cache', you will see that this plugin offers a fallback option if the CDN cache is unreachable for some reason. This 'Disk Page Cache' also has a lifespan setting - and it's set to 0 by default (has no expiration). I would recommend to set it equal to the edge cache duration - 2.592.000 seconds (equivalent to 30 days). Don't forget to save all the changes. [Check the image below]

Image 3.12 (Small business website speed tutorial)

The good thing about this plugin, is that it avoids caching dynamic pages by default (like search result), especially important for visitors that are logged in (if you have a membership or e-commerce website). You'll find those options under the 'Cache' and 'Third Party' tabs (including integration with 'WooCommerce', 'Easy Digital Downloads' and few other useful WordPress plugins). [Check the image below]

Image 3.13 (Small business website speed tutorial)

There are many other options I didn't mention here. Don't be afraid to check them out.

One last note before we finish - sometimes you'll need to manually purge the cache in order to see the changes made on your website. That's why you have that button on top of the plugin's options page. Purging the cache refers to emptying the cache storage and forcing the storage of updated files.

IV. Image optimization

1. Why it's important for your website to have optimized images?

Images usually make more than half of the overall size of any webpage. Optimizing them helps you to reduce the loading time of your website greatly. This results in improved user experience and better SEO rankings.

There's more than one way to optimize your images:

  • Resizing images to fit the dimensions needed for a specific page element (usually smaller than the original size);
  • Compression to reduce the image file size, while preserving their quality;
  • Conversion to WebP - leverages the modern image file format(s) that are significantly smaller in size.

While they's always an option to manually optimize your images before upload, it takes more time and effort than using existing WordPress plugins.

When it comes to image resizing - WordPress resizes (and crops) any uploaded image to 3 different sizes. These sizes are:

  • Thumbnail (150 x 150px)
  • Medium (300 x 300px)
  • Large (1024 x 1024px)

Usually, this significantly reduces the size of your website images, because most WordPress themes use those default image sizes or set their own custom resolutions.

You can change these sizes in your admin dashboard - found in the main menu, under the 'Settings' section, the 'Media' submenu item. In most cases, you shouldn't change these default settings. [Check the image below]

Image 4.1 (Small business website speed tutorial)

WordPress also stores the original image files and their resolutions, but it's rarely needed. Actually, WordPress scales down high resolution images to 2560 x 2560px (or smaller based on original aspect ratio), and uses them instead of originals.

Considering devices people use for web browsing, and their screen sizes, you don't need anything larger than that, even if you're building an image intensive portfolio website (for photography, graphic design etc.).

In case you need to resize or crop your website images, WordPress provides a basic image editor. If you go to your media library (found in the main menu - 'Media' section, 'Library' submenu item), you can tap on any image to see it's current dimensions. There's also a button 'Edit Image' that leads you to the image editor. [Check the image below]

Image 4.2 (Small business website speed tutorial)

2. How to set up image optimization in WordPress

When it comes to image compression, there are WordPress plugins that offer this without changing the file type of your images. But I would always recommend you to use a plugin that converts all of your images to WebP format - reducing file size of your images for at least 50%. This new image format is supported in the newer versions of all web browsers.

WordPress plugin that I recommend for this is 'Converter for Media – Optimize images | Convert WebP & AVIF' (it's free and easy to set up). First step is to install the plugin in your admin dashboard.

Head over to the main menu, and find the 'Plugins' menu item. Tap on it to reveal the sub-menu items. Now tap on the 'Add New Plugin' to go to the 'Add Plugins' page.

There you should type in the search input field the name of this plugin. Once it shows in your search results, tap the 'Install Now' button to install it. It will take few seconds for the installation to finish. You'll know it's finished, because the 'Install Now' button will be changed into 'Activate' button. Tap on it to active the plugin. [Check the image below]

Image 4.3 (Small business website speed tutorial)

After the plugin is installed and activated, you should go to its settings page - found in the main menu, under the 'Settings' section, 'Converter for Media' submenu item.

When you get to the plugin's settings page, under the 'General Settings' tab you will see the different conversion options. The default option labeled 'Optimal' is the best option for most use cases. [Check the image below]

Image 4.4 (Small business website speed tutorial)

If you scroll down, you will come to the 'Supported directories' section - where you can select more than just uploads folder images to convert into WebP. To be more exact, you can select themes and plugins folders also.

Don't forget to tap the 'Save Changes' button and store all the changes you made so far. [Check the image below]

Image 4.5 (Small business website speed tutorial)

Below this section, you'll come to the 'Bulk Optimization of Images' section. Here you can clearly see how many images have been converted so far, and how many are left to be converted to WebP format. [Check the image below]

Image 4.6 (Small business website speed tutorial)

In order to convert them, tap on the 'Start Bulk Optimization' and wait for the process to be done. It can take up to several minutes, depending on the number of images you have to convert. [Check the image below]

Image 4.7 (Small business website speed tutorial)

Under the 'Advanced Settings' tab, you can find some additional options. Most of the default settings should remain as they are. The only thing to consider is the option to exclude certain folders or subfolders for image conversion. That is if you need the original file format quality, because each compression reduces it to a certain point. [Check the image below]

Image 4.8 (Small business website speed tutorial)

3. Bonus tip: Don't use image sliders (carousels) on your website

If you're considering using image sliders on your website, especially at the top of the homepage - think twice. This area (also called above the fold), on your homepage or other landing pages is the first thing most visitors see. That's why you need to display a clear message and call to action there - like a buy or schedule button.

Sliders not only slow down the website loading speed, but they also have a direct imact on your SEO rankings. Many research have shown it's annoying for the users, and most people ignore them completely.

You should consider using a single image in place of a slider, especially on the top of a page. If you really need to show more images, use an image gallery with lightbox (pop-up window that opens images in their full size), somewhere below the fold.

WordPress offers many free gallery plugins. Test a few and see what fits best based on its functionality and design.

One more note here - you don't need an additional plugin for image lazy loading, since WordPress offers that out of the box. Lazy loading means that the images are loaded just as they enter the viewport - additional improving website speed and performance.

V. File optimization

1. Why it's important to reduce the size of your website files?

Besides the images, the biggest impact on the size of your website pages and their loading speed, are your website files. That's why it's important to reduce their size in order to improve your website's performance.

There are 2 ways to reduce the size of your website files:

  1. File minification
  2. File compression

2. How to do file minification

File minification reduces the size of your files by removing spaces between the characters in them. While you can do this manually on the web, it would require you to do one file at a time. This is why it's faster and easier to do it with a WordPress plugin.

There's a number of few options for this, but my recommendation is 'Merge + Minify + Refresh'. It's a simple to set up, with a handful of options strictly focused on file minification and grouping (grouping reduces number of HTTP requests on a webpage).

As always, the first thing is to install this plugin in your admin dashboard. Head over to the main menu, and find the 'Plugins' menu item. Tap on it to reveal the sub-menu items. Now tap on the 'Add New Plugin' to go to the 'Add Plugins' page.

There you should type in the search input field the name of this plugin. Once it shows in your search results, tap the 'Install Now' button to install it. It will take few seconds for the installation to finish. You'll know it's finished, because the 'Install Now' button will be changed into 'Activate' button. Tap on it to active the plugin. [Check the image below]

Image 5.1 (Small business website speed tutorial)

After the plugin installation and activation, you can go to its settings page. It can be found in the main menu, under the 'Settings' section - submenu item 'Merge + Minify + Refresh'. There you'll see a number of checkbox options - to disable or enable a certain feature. [Check the image below]

Image 5.2 (Small business website speed tutorial)

In most cases, everything should remain unchanged, and plugin should work out of the box. In case you notice some unusual website behavior (design gets messed up, or some functionality stops all of a sudden) - it's possible there's a conflict with some other WordPress plugin.

In this case, you should go back to the plugin's settings page and test each option. Don't forget to save each change by tapping the 'Save' button at the bottom of the settings page. Keep in mind that you'll maybe need to purge the cache storage manually (through your 'Super Page Cache' plugin settings page), in order to see any change.

In the case you haven't encountered any issues, you can move on to file compression setup. File compression is a process that can additional reduce the size of your website files - beyond the previously mentioned white space removal.

3. How to enable file compression

Although 'Merge + Minify + Refresh'' plugin offers a compression option, it's better and easier to set it through the Cloudflare CDN (you already connected to your website in one of the previous steps).

The first step here is to head over to the Cloudflare CDN website, and log into your account. Once you log in, select your website under the websites list - by tapping its name. [Check the image below]

Image 5.3 (Small business website speed tutorial)

This will open the 'Overview' page for your website. Now, open the main menu - located at the top left corner (in the header section). Find the 'Rules' menu item and tap on it to reveal the sub-menu items. Tap the 'Compression Rules' item. [Check the image below]

Image 5.4 (Small business website speed tutorial)

On the 'Compression Rules' page, tap the '+ Create rule' button to open the rules editor. [Check the image below]

Image 5.5 (Small business website speed tutorial)

In the editor you need to fill out the name for this compression rule first - in the input field labeled as 'Rule name'. Leave the 'Default Content Types' option selected - it includes all of your website files (HTML, CSS, JavaScript and images). [Check the image below]

Image 5.6 (Small business website speed tutorial)

Now scroll down until you come to the 'Compression options' section, and select the 'Enable Brotli and Gzip Compression'. Save these changes by tapping the button 'Deploy'. [Check the image below]

Image 5.7 (Small business website speed tutorial)

The last thing you need to set up when it comes to your website files is the asynchronous loading of your scripts.

4. Asynchronous script loading

Asynchronous loading is a allows certain resources on a web page (such as scripts), tobe loaded in the background while the rest of the page continues to load. This means that these resources won’t block the rendering of the page and can speed up the overall page load time.

Again, this is done through your Cloudflare CDN dashboard. Open the main menu, and tap the 'Speed' menu item to reveal the sub-menu items. Tap the 'Optimization' to open 'Speed Optimization' settings page. [Check the image below]

Image 5.8 (Small business website speed tutorial)

On this page, near the very top you'll see different tabs (starting from 'Recommendations' that's selected by default). You'll need to scroll horizontally to find the 'Content Optimization' tab. [Check the image below]

Image 5.9 (Small business website speed tutorial)

Once you open this tab, scroll down until you reach the section titled 'Rocket Loader'. Tap the slider to turn on this settings (since it's turned off by default). [Check the image below]

Image 5.10 (Small business website speed tutorial)

As with previously mentioned settings, if you see any unusual behavior on your website - you'll probably need to turn it off since it conflicts with some script execution order.

X