Please enable JavaScript to view this site.
Logo for imoptimal.com - small business website expert

Small business website privacy (Towards better conversion rate)

I. Privacy policy page

1. Why is user privacy important for the conversion rate of your website?

Having a privacy policy on your website, not only helps you avoid legal troubles (since it's a requirement in most parts of the world) - it helps you build trust with your website's visitors. That trust:

  • helps you keep more clients, since many people end their relationship with companies over data privacy concerns;
  • it enables a longer-term relationship with your clients (increasing their lifetime value - amount of money they spend on your products/services).

2. How to create a privacy policy page template

There's few ways to create all of the needed statements for the privacy policy page on your website:

  • Using online generators (websites specialized for creating privacy policy page templates);
  • Doing it directly in WordPress (that provides privacy policy page template out of the box).

The first way provides a more detailed template, but you need to embed it manually as a piece of code. The second approach is simpler. But you can always combine them - paste needed parts of text generated outside of WordPress, into an existing WordPress privacy policy page template.

2.1 Using online generator

There are many online privacy policy generators, but I prefer a specific one for it's detailed approach - Termly. They have a free account option, that enables you to create policy page templates for a single website.

When you head over to Termly website, you'll need to create an account. On their homepage, open the main menu (located in the header section, top right corner), by tapping on the icon. [Check the image below]

Image 1.1 (Small business website privacy tutorial)

Once the menu is opened, scroll down until you reach the 'Sign In' menu item (at the bottom of the main menu). Tap on it to open the sign in form. [Check the image below]

Image 1.2 (Small business website privacy tutorial)

Under the sign in form you'll see a 'Sign up' link. Tap on it to go to the account creation form. [Check the image below]

Image 1.3 (Small business website privacy tutorial)

The form looks similar to the sign in form. You'll need to write your email address and the password in the input fields. After you've created the account, log into your Termly dashboard.

Once you log in, you'll notice that their dashboard isn't mobile responsive (not adjusted for smaller screens). So to locate and reach certain things you'll need to zoom out a bit.

First thing you need to do is to register your website. You'll find '+ NEW WEBSITE / MOBILE APP' button in the header section or the middle of the dashboard starting area (if you zoom out). [Check the image below]

Image 1.4 (Small business website privacy tutorial)

When you tap on that button, a pop-up will open with 2 input fields - Name, and Site URL. You'll need to zoom out again to locate it (in the middle of the dashboard area). After you've filled out those input fields, tap on the 'Save' button. [Check the image below]

Image 1.5 (Small business website privacy tutorial)

In the main menu (located at the left side of the dashboard), tap on the 'Policies' menu item, to open all of the policy page templates available. Every website needs a privacy policy page, but depending on the features you have in your particular case - maybe you'll need additional templates. [Check the image below]

Image 1.6 (Small business website privacy tutorial)

For example, if you have an e-commerce website, you'll need to think about return and shipping policy. In this tutorial, I'll show you the privacy policy template setup. Don't worry, all other templates are created and embedded in the same way.

Now, tap on the 'Privacy Policy' submenu item. Zoom out the dashboard page, and locate the '+ NEW PRIVACY POLICY' button. It's in the middle of the dashboard area. [Check the image below]

Image 1.7 (Small business website privacy tutorial)

This will open the privacy policy building form. This part of the dashboard is mobile responsive. There's a number of steps to finish, and on each one you need to tap 'SAVE & NEXT' button to go to the next step. [Check the image below]

Image 1.8 (Small business website privacy tutorial)

Once you finish with all of the steps and publish the privacy policy page template, you'll be redirected back to the dashboard area. Privacy Policy Preview will be opened, and here you need to scroll horizontally to the right to find the 'ADD TO WEBSITE' button. [Check the image below]

Image 1.9 (Small business website privacy tutorial)

Tapping on this button will open a pop-up. Again, you'll need to zoom out and locate it, in the middle of the dashboard area. You'll need to tap the 'COPY TO' button to copy the whole template (including text and HTML/CSS code). [Check the image below]

Image 1.10 (Small business website privacy tutorial)

The code and text you've just copied, should be pasted into WordPress page reserved for privacy policy. I'll show you how right after I show you where to locate the default WordPress privacy policy page.

2.2 Using the default privacy policy template in WordPress

As I said before, if you're using WordPress - there's a much simpler way to create a privacy policy page, but less detailed. When you log in to your wp-admin dashboard, open the main menu (tap the icon located at the top right corner, in the header section). Scroll down to reach the 'Settings' menu item, and tap on it to reveal the sub-menu items. Now tap on the 'Privacy' submenu item, to go to the privacy policy settings page. [Check the image below]

Image 1.11 (Small business website privacy tutorial)

Once on this page, you'll see two tabs. The first tab is titled 'Settings', and it enables you to preview or edit the default privacy policy page (automatically created upon WordPress installation as a page draft), or choose another custom page instead. [Check the image below]

Image 1.12 (Small business website privacy tutorial)

Second tab titled 'Policy Gude', provides you a brief explanation for each part included in the privacy policy page draft. It also suggests what to edit/change and why. [Check the image below]

Image 1.13 (Small business website privacy tutorial)

If you decided to copy/paste the privacy policy page template from Termly, you should go back to the first tab, and tap on the 'Edit' link, to open the page editor. Once there, open the menu by tapping the 3 vertical dots icon (located in the top right corner, header section). [Check the image below]

Image 1.14 (Small business website privacy tutorial)

In the menu, tap on the 'Code editor' (in the 'EDITOR' section), to expose the code behind the existing privacy policy page. You should replace parts or all of it with the content pasted from Termly. [Check the image below]

Image 1.15 (Small business website privacy tutorial)

In the next step, I'll show you how to set up cookie consent banner. Although Termly offers this feature (also in the form of WordPress plugin), I prefer using another service provider. It's because they offer a more generous free and paid tier.

II. Cookie consent

1. What features to look for in a cookie banner

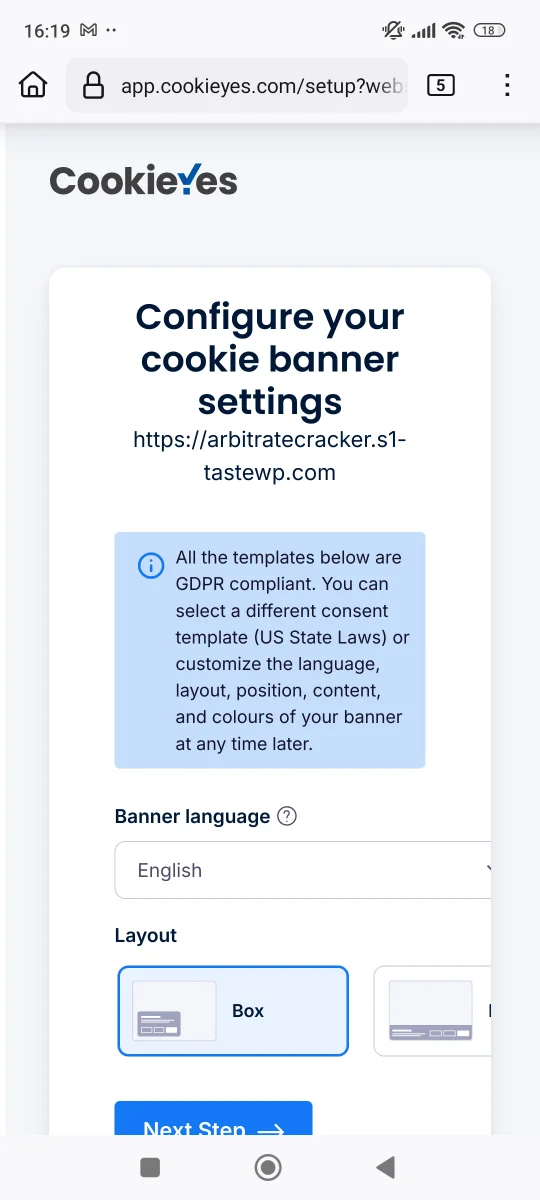
You're probably aware that's it's a legal requirement, to provide website users with cookie consent form. This form should provide complete information about all of the scripts that collect data about your website visitors. Scripts are grouped into different categories:

  • necessary scripts that can't be turned off, since it would break your website (for example Cloudflare CDN security related scripts);
  • functional scripts that enable important additional features on your website (for example scripts related to social media content shared on a website);
  • analytical scripts that collect data about user behavior (for example Google Analytics, or some heatmap/session recordings services like Microsoft Clarity);
  • performance scripts that enhance your website's performance (any script related to website speed improvement);
  • advertisment scripts (any script related to ad campaigns).

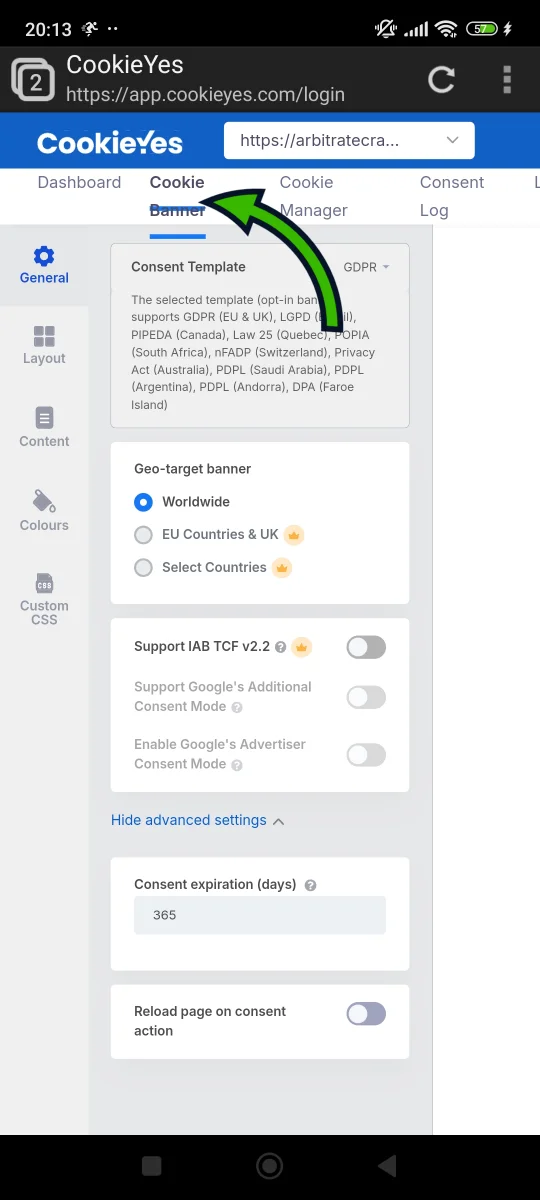
All but the necessary and functional scripts should be blocked by default, unless user decides to 
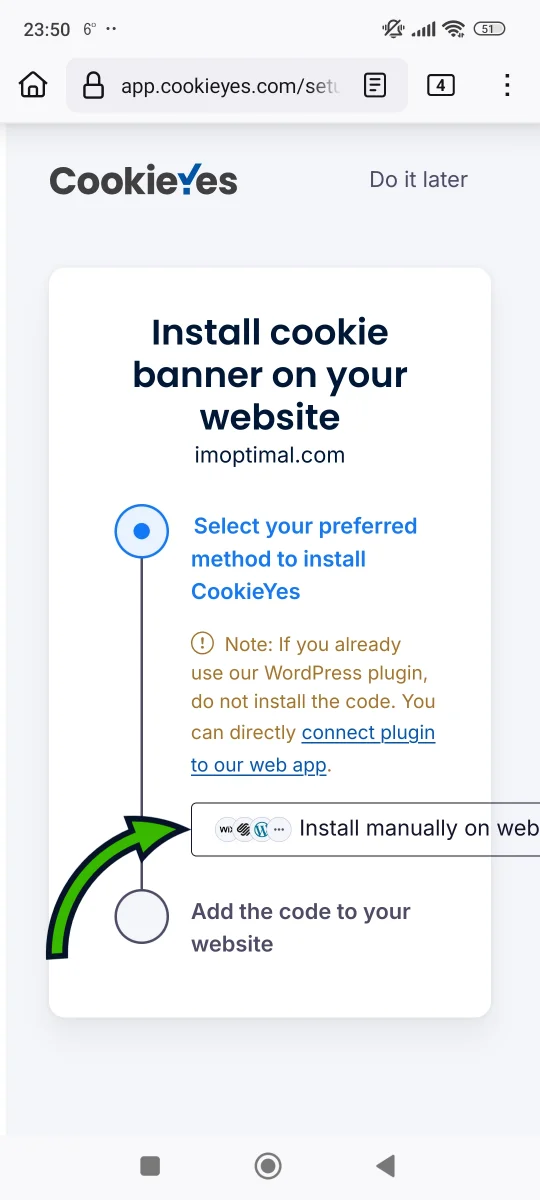
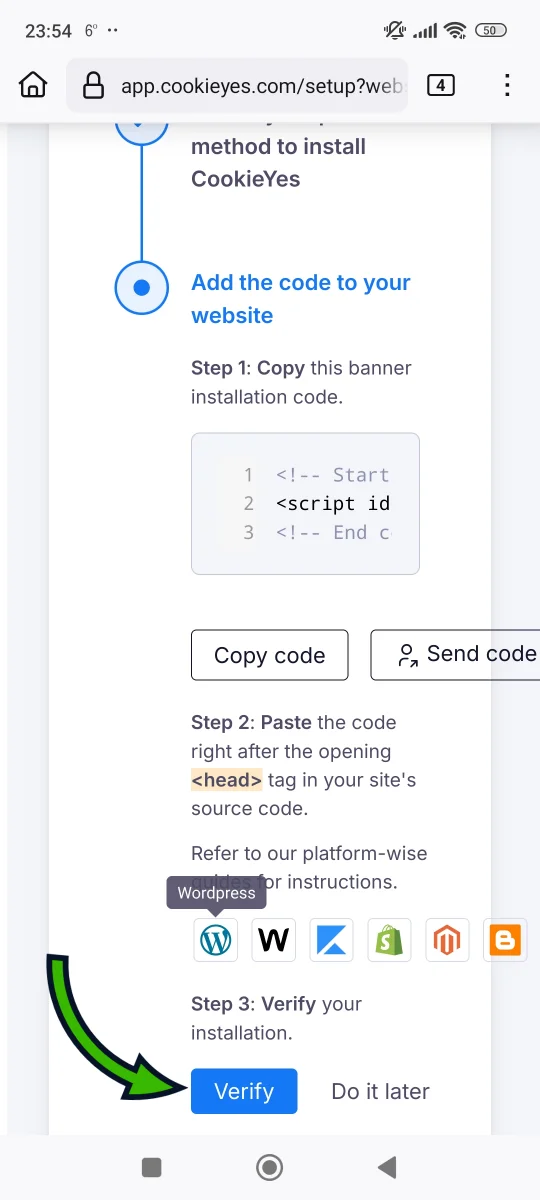
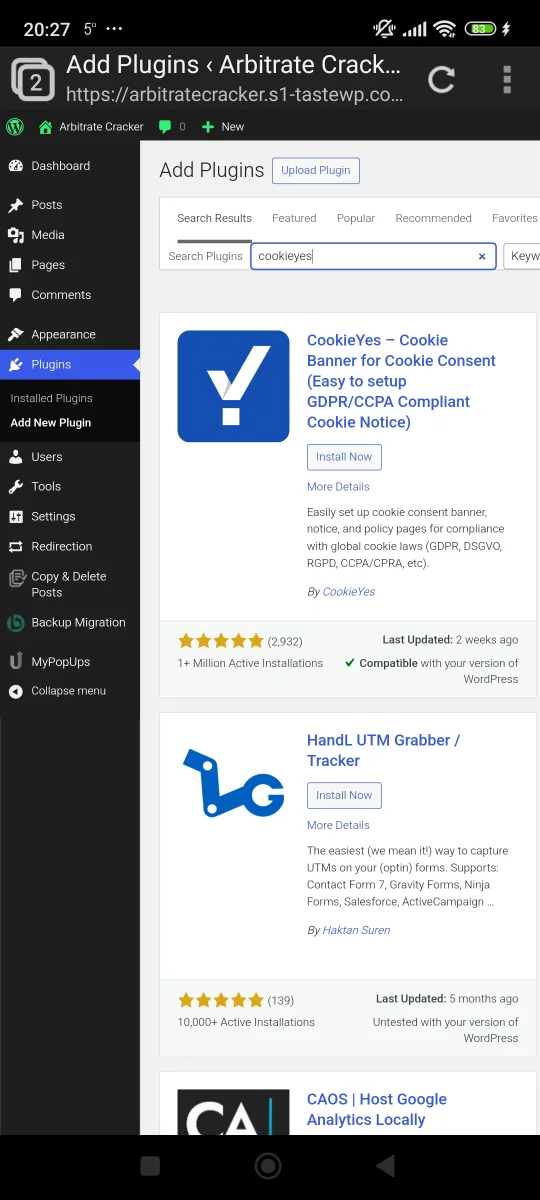
enable them. Don't worry, you won't need to detect and group the website scripts manually. Most popular cookie consent service providers scan your website and do this automatically.

The less known requirement about cookie consent form, is that you need to provide consent management. This means that you need to enable the website visitors to opt-in and opt-out at any given time. Also, you need to keep a consent log, in case of any legal trouble. Lastly, you should set a duration of cookies under 6 months.

2. How to set up a cookie consent banner

There are 2 ways to get a cookie consent banner for your website:

  • embedding it manually after you generate it online;
  • getting it through a WordPress plugin.

No matter what way you choose, you'll need to set up an account for a service provider first. There's a number of options here, but I recommend the service with the most generous free and paid tier I've encountered - CookieYes.

Go to their homepage, and open the main menu (located in the header section, top right corner), by tapping on the icon. [Check the image below]

Image 2.1 (Small business website privacy tutorial)

Locate the 'Log in' menu item at the bottom of the menu. Tap on it to open the sign in form. [Check the image below]

Image 2.2 (Small business website privacy tutorial)

Under the sign in form, you'll see the 'Sign Up' link. Tap on it to go to the account creation form. [Check the image below]

Image 2.3 (Small business website privacy tutorial)

Here you'll need to write your email adress, website and password in the input fields, and tap on the 'Get Started' button. [Check the image below]

Image 2.4 (Small business website privacy tutorial)

2.1 Generating it online

This will open cookie banner quick setup page. You'll need to choose basic design for your cookie banner first. Tap on the 'Next step' button to proceed. [Check the image below]

Image 2.5 (Small business website privacy tutorial)

After that you must choose to connect the CookieYes account with their official WordPress plugin, or install it manually on a website. [Check the image below]

Image 2.6 (Small business website privacy tutorial)

Since I'm gonna show you how to set it up manually first, tap on the 'Install manually on website' button. You'll see a code snippet, that you need to copy to the . tag of your website. And after you've pasted that code, you need to verify it by tapping on the button 'Verify'. [Check the image below]

Image 2.7 (Small business website privacy tutorial)

Once your website is verified, you can customize design of the cookie banner. In the CookieYes dashboard, you'll find all of the options listed in the main menu (located at the left side of the dashboard). Tap on the 'Cookie Banner' menu item, to find all of the settings available.

Unfortunately, their dashboard has serious usability issues. It's not mobile friendly, plus the menu covers access to some settings. This is also an issue with their WordPress plugin as well.

Since there's no better service provider, you'll need to install one mobile app to help you view websites in their desktop mode. The default desktop mode in mobile browsers (like Chrome or Firefox) doesn't always work as intended. You'll find this app in the play store - 'Desktop FullScreen Web Browser'. [Check the image below]

Image 2.8 (Small business website privacy tutorial)

After you open the CookieYes dashboard in the desktop mode app, you'll need to use zoom in/zoom out functionality. Otherwise you won't find all the needed dashboard items. At the top left corner of the dashboard you'll see main menu items. Tap on the 'Cookie Banner' menu item to open the cookie banner settings page. [Check the image below]

Image 2.9 (Small business website privacy tutorial)

Cookie banner settings are grouped into 5 different tabs (located at the left side of the dashboard):

  • General (you need to tap 'Show advanced settings' here and set the cookie expiration to 180 days; also turn on 'Reload page on consent action');
  • Layout (here you can choose the position of the cookie banner icon, and the position and shape of the cookie banner element when it's opened);
  • Content (under this tab you can change all of the content of the cookie banner element, including cookie policy);
  • Colours (you can choose one of the existing templates, or set custom colors for every part of your cookie banner);
  • Custom CSS (only for advanced users, to add your custom CSS styles if needed).

Don't forget to tap 'Publish Changes' button at the bottom of the each tab, after you made the recommended changes.

They scan your website for existing scripts and group them automatically. You can see this if you open the 'Cookie Manager' in the main menu. You can also see all of the stored cookie consent (accepted or rejected) if you open the 'Consent Log' menu item. That's only needed in case of a legal dispute.

2.2 WordPress plugin setup

Now, let me show you how to set up cookie banner if you have a WordPress website. First, you'll need to install 'CookieYes – Cookie Banner for Cookie Consent' plugin in your admin dashboard. You'll need to do this in the desktop mode app, since there are some responsivness issue here as well.

Open your wp-admin dashboard, then head over to the main menu, and find the 'Plugins' menu item. Tap on it to reveal the sub-menu items. Now tap on the 'Add New Plugin' to go to the 'Add Plugins' page.

There you should type in the search input field the name of this plugin. Once it shows in your search results, tap the 'Install Now' button to install it. It will take few seconds for the installation to finish. You'll know it's finished, because the 'Install Now' button will be changed into 'Activate' button. Tap on it to active the plugin. [Check the image below]

Image 2.10 (Small business website privacy tutorial)

After the plugin installation and activation, you can go to its settings page. It can be found in the main menu, as a 'CookieYes' top menu item. Tap on it to go to the plugin's settings page. Once there, tap on the 'Connect to Web App' button to connect your CookiYes account with the WordPress plugin.

You can use the standalone WordPress plugin, without connecting it to CookieYes account, but you'll have limited features. [Check the image below]

Image 2.11 (Small business website privacy tutorial)

Select the top option ('Already have a CookieYes account?'), then scroll down and tap on the 'Log in & Connect' button. This will open the CookieYes dashboard in another tab. [Check the image below]

Image 2.12 (Small business website privacy tutorial)

If you're not already logged in, you should log in now and tap the 'Log In & Connect to CookieYes' button. [Check the image below]

Image 2.13 (Small business website privacy tutorial)

Now you need to choose if you'll keep the settings made on their website, or will you override them with the settings from the WordPress plugin. [Check the image below]

Image 2.14 (Small business website privacy tutorial)

If you go back to the plugin settings page in your wp-admin dashboard, you'll see a different set of tabs available. You will see the cookie summary, consent log trends and page views. For most of the settings you'll need to go to the CookieYes website, by tapping the button 'Go to Web App' at the top of the settings page. [Check the image below]

Image 2.15 (Small business website privacy tutorial)

It may seem that you had to do one more unnecessary step, by installing the desktop mode app on your phone. Trust me when I say, you'll need it for for more than cookie managment. It's handy for managing many advanced website features on your phone. I'm using it for the CRM I use (Brevo). You just need to get used to zooming in and out when needed.

X